I wanted to create a project suitable for beginners that does more than your average hello world sample out there on the internet. The project I created that will be described on this page and will show you how to run an augmented hello world that includes:
- A GPIO example that is wired up to an accumulator implemented using RTL (Verilog)
- A FIFO loopback test
- A DMA FIFO loopback test
Additionally, this example can be run in multiple ways, all from the command line or by using the Vitis User Interface:
- Bare-Metal
- FreeRTOS
If you are a beginner, I hope this saves you a lot of time.
Getting Started
1 – Download and Install:
- Vivado 2024.1
- Vitis 2024.1
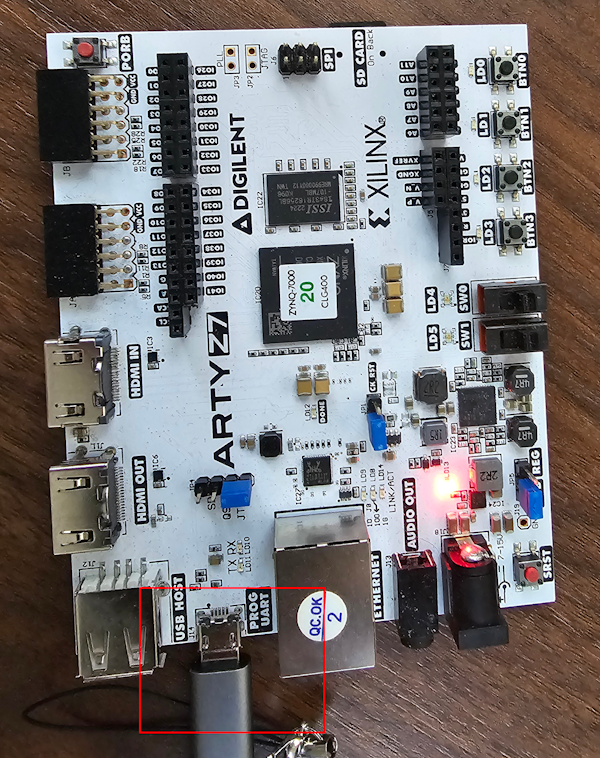
2 – Connect your Arty Z7-20 to your machine via USB
3 – Clone the Git Repository
mkdir -p ~/work/artyz7
cd ~/work/artyz7
git clone git@github.com:FpgaJohn/arty_hw.git
Manual Recreation of Project
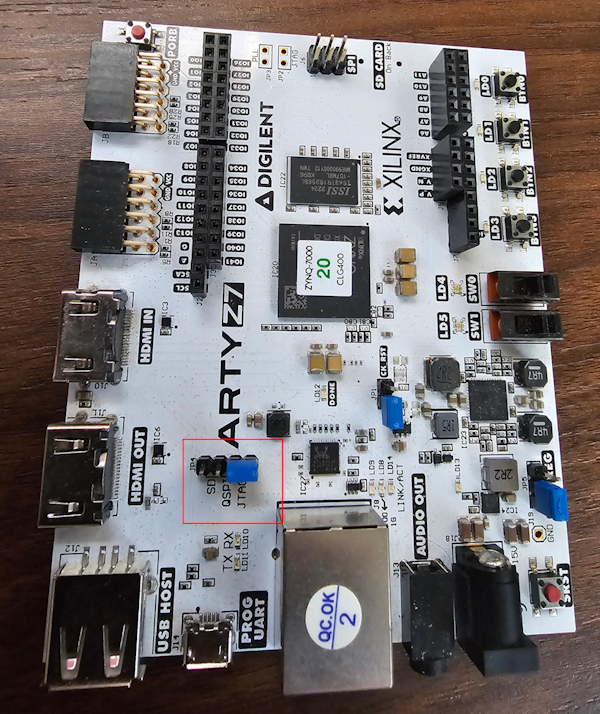
NOTE: You must set the Arty Z7-20 jumper to JTAG, otherwise the commands will not work out-of-the box:
1 – Open Vivado and Recreate Block Design
# Source Vivado Tools
 . /tools/Xilinx/Vivado/2024.1/settings64.sh

# Launch Vivado
vivado &
Find the TCL Console at the bottom of Vivado, and navigate to the arty_hw/vivado directory and source the arty_hw.tcl TCL script.
cd ./arty_hw/vivado
source ./arty_hw.tcl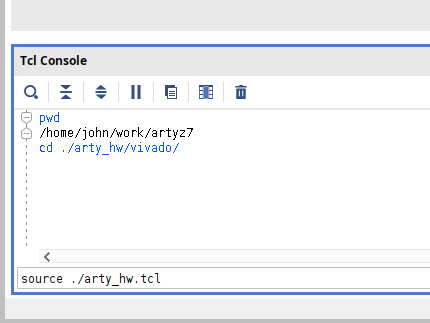
Inspect the block design and you will see:
- A Dual channel GPIO with all Outputs set and connected to a custom IP Block named “my_state”
- A Dual channel GPIO with all Inputs set and connected to the output of the same custom IP Block named “my_state”
- An AXI-Stream FIFO (4.3) configured to use AXI4-Lite as its interface and whose TXD is connected to its RXD port
- An AXI Direct Memory Access (7.1) IP Block configured with all vanilla options, that is without scatter gather mode that does not allow unaligned writes
- If you follow the S_AXIS_S2MM and the M_AXIS_MM2S ports you will see that they are both connected to the same AXI4-Stream Data FIFO (2.0). This too is also configured to be 32-bits wide, see the TDATA width value which is set to 4 bytes.
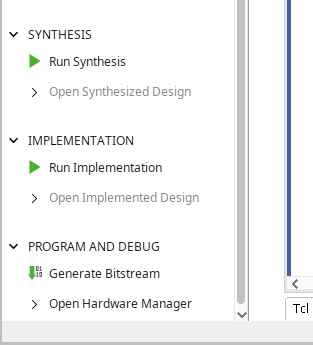
2 – Synthesize, implement and generate the bitstream
In the bottom left of the Vivado window click on the “Generate Bitstream” and wait for it to complete. You can always check the TCL Console to see it progress through its various stages.
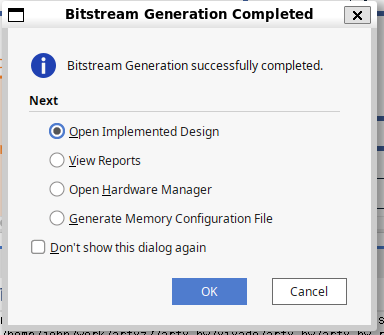
When the bitstream has been generated you will see the following window, just click cancel.
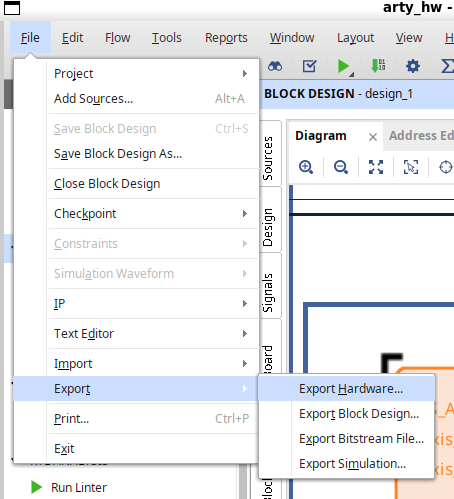
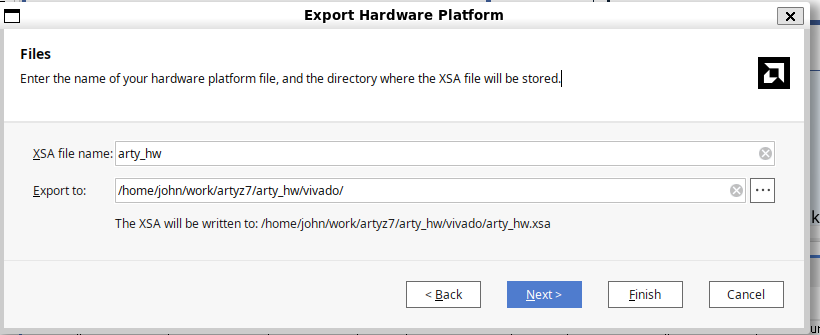
3 – Export the XSA file
Now export the bitstream:
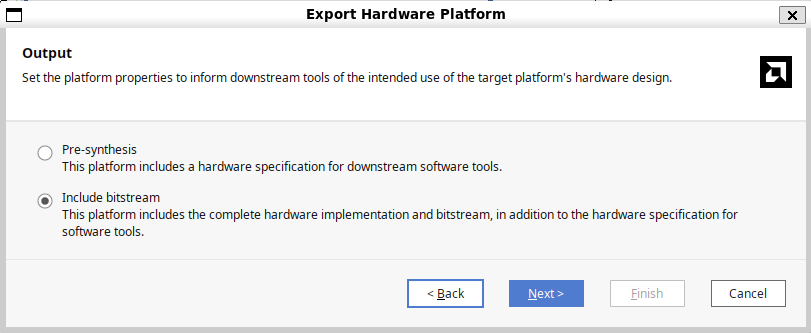
- Clicking “File->Export->Export Hardware”.
- Select “Include bitstream”
- Update the file name to arty_hw, and the directory to be the parent directory ~/work/arty_z7/arty_hw/vivado (see screenshot below)
- This will allow the Makefile to be able to find the xsa file in case you want to run the apps via the Makefile in the future.
- vivado/arty_hw.xsa
4 – Start Vitis
You can exit from Vivado if you wish. Regardless, you will have to source the Vitis tools and then start Vitis in classic mode from inside the apps /vitis directory. You will have to create the vitis directory and set that directory to be your workspace path.
# Source the Vitis Tools
. /tools/Xilinx/Vitis/2024.1/settings64.sh

# Create a workspace directory named vitis
cd ~/work/artyz7_arty_hw/apps
mkdir vitis

# Start Vitis 2024.1 in Classic Mode
vitis --classic &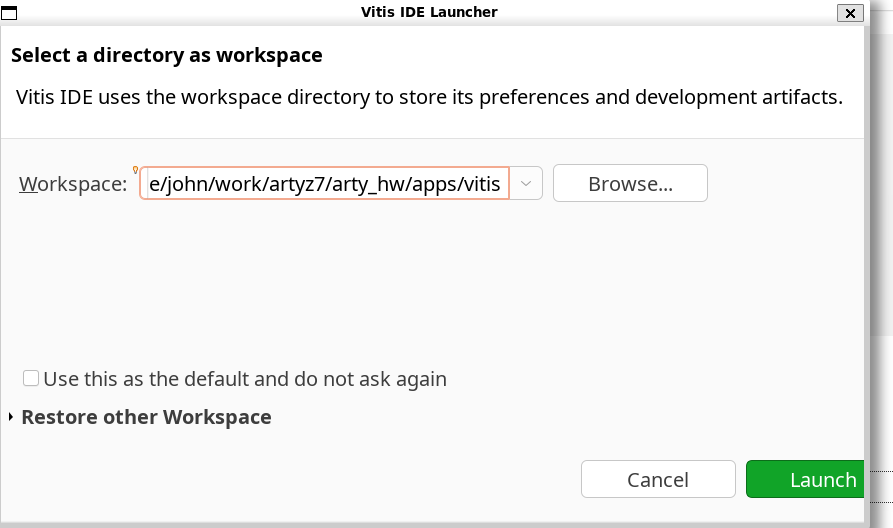
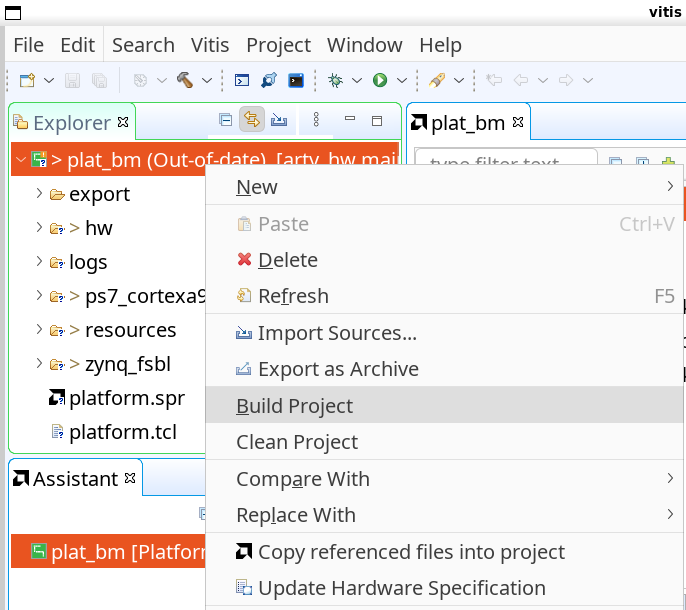
5 – Create Platform Project
- Click “File->New->Platform Project”
- Name the project plat_bm
- Browse to and select the XSA file from the previous step
- No need to change anything else, click Finish
- Right click on the project and select Build
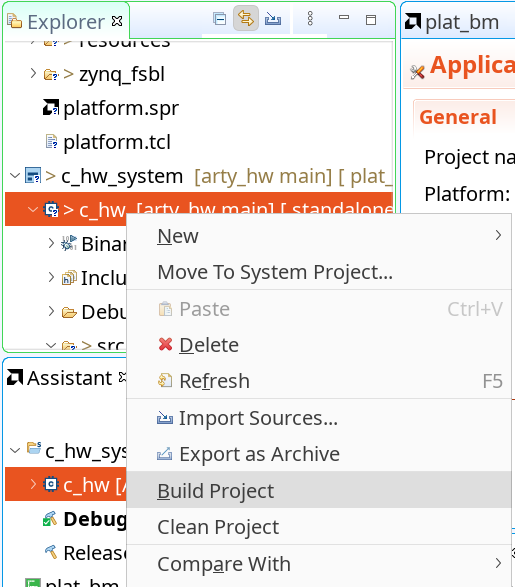
6 – Create C Application with Board Support Project
Create a C Application:
- Click File->New->New Application
- Make sure plat_bm is selected as the Platform
- Name the project c_hw
- The defaults should be fine until you reach the Templates window
- Select “Empty C Application”
- Click Finish
Now import the sources:
- Right click on src and select “Import Sources”
- Browse to the ~/work/artyz7/arty_hw/app/arty_hw_bm directory and select Open
- Check the following files:
- main.c
- mmio.c
- mmio.h
- Right click on the c_hw application and select Build
7 – Run Bare-Metal Application in Debug Mode
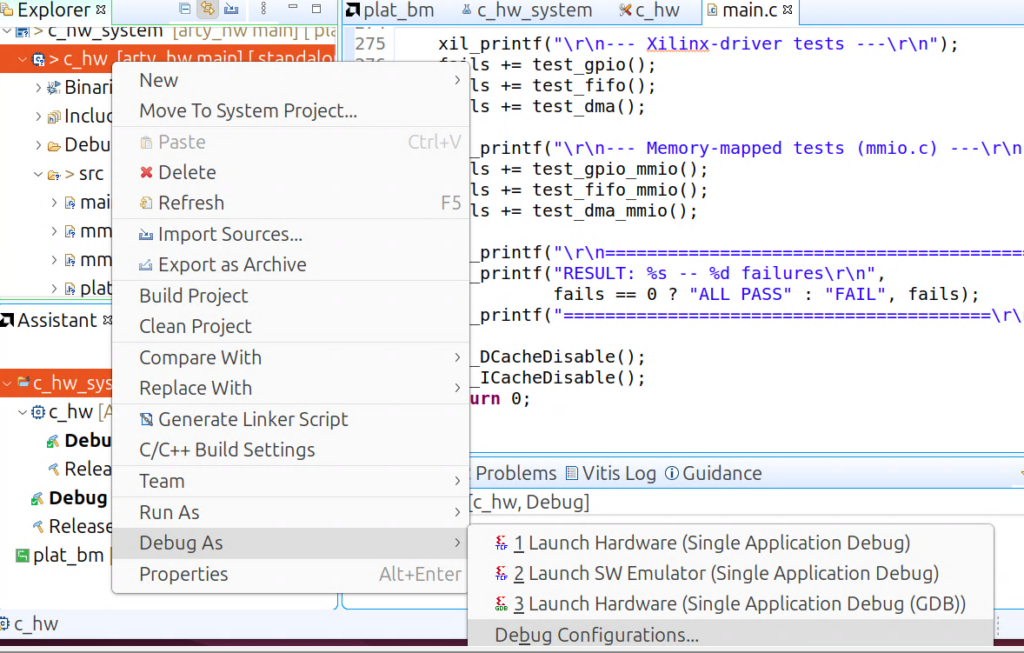
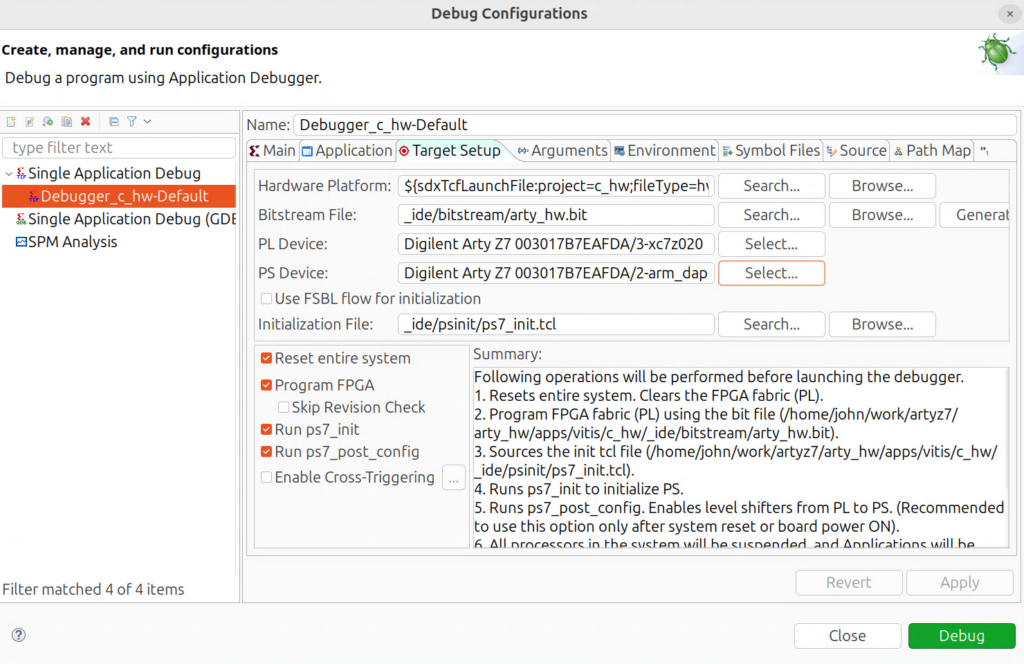
Right click on the project “c_hw” and select “Debug As-> Debug Configurations…”
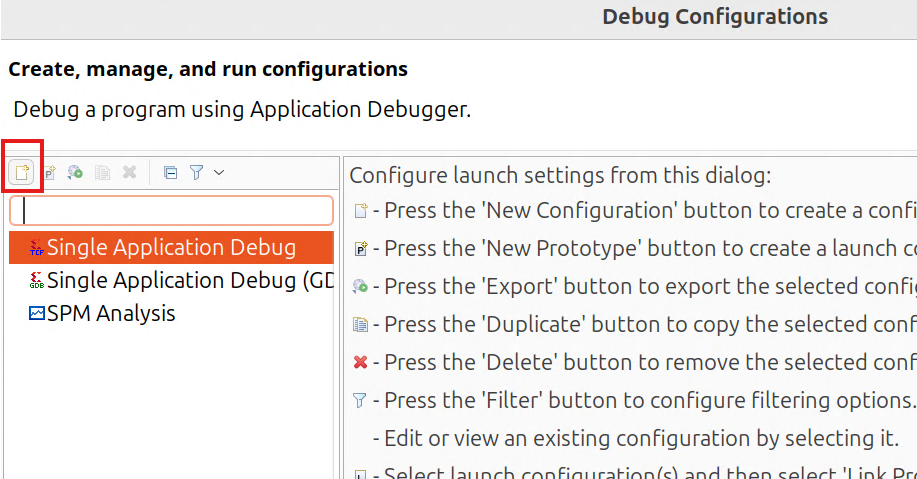
Click on the left most icon to add a new configuration under “Single Application Debug”
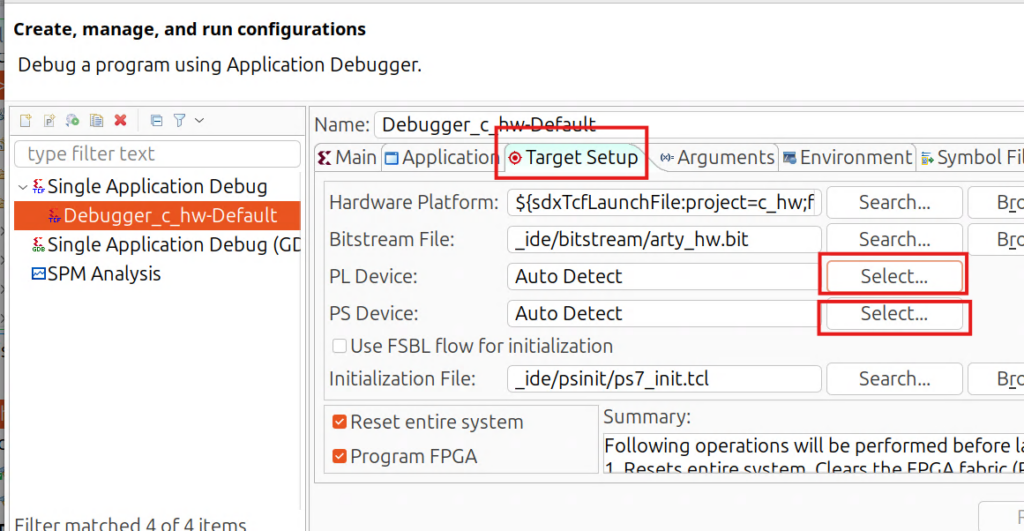
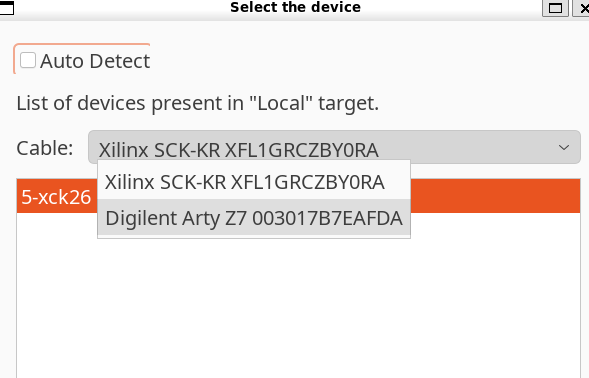
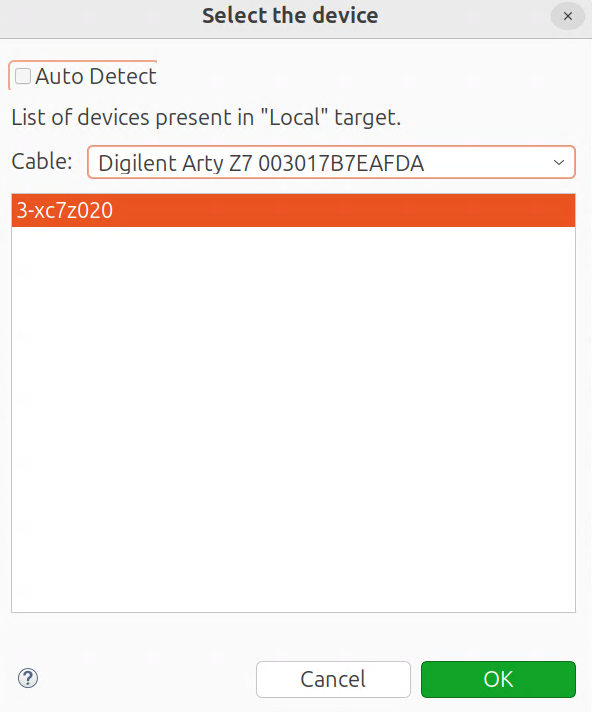
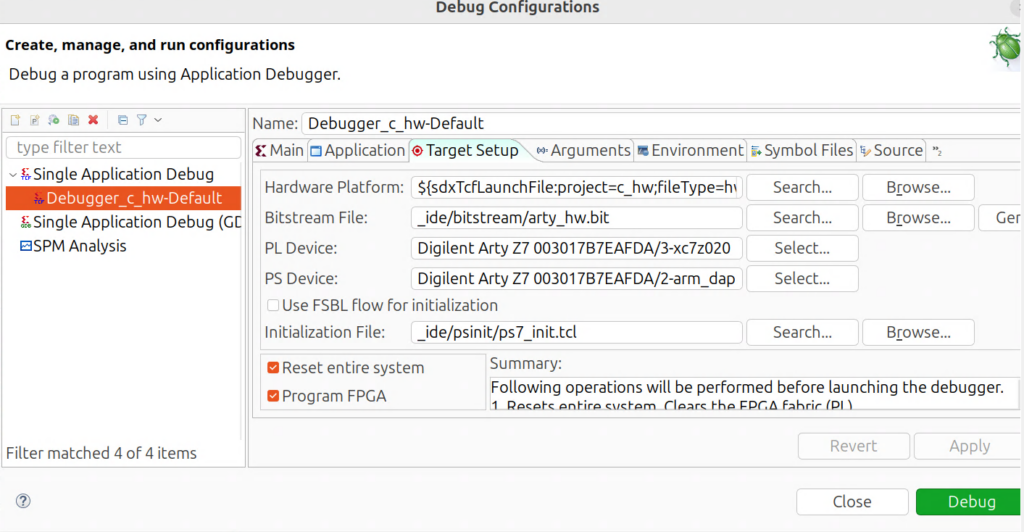
This should not be an issue for most users, but it is in my case since I have multiple FPGA boards plugged in. Go to “Target Setup” And make sure that the PL Device and PS Device options are both pointing to the Digilent Arty Z7.
Hit Debug and monitor the console
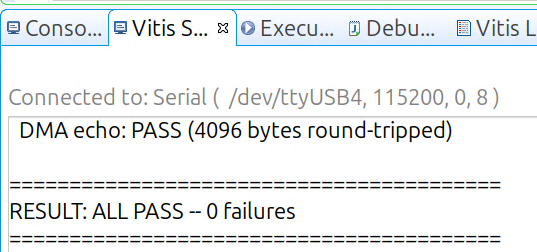
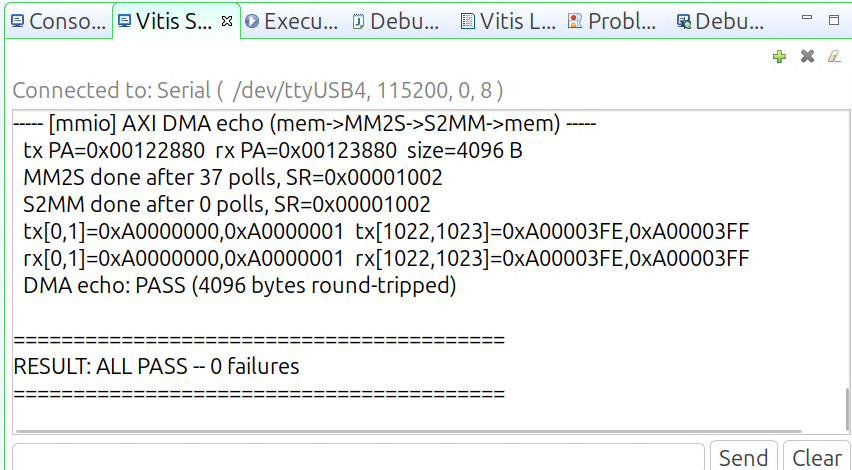
Then connect the Vitis Serial Terminal to the appropriate port and view the output:

8 – Create FreeRTOS App
Now you are going to have to create another Application Project with a new Domain that supports FreeRTOS.
Click “File->New->Application Project”
Select your existing Platform project (plat_bm)
Name the project c_hw_rtos
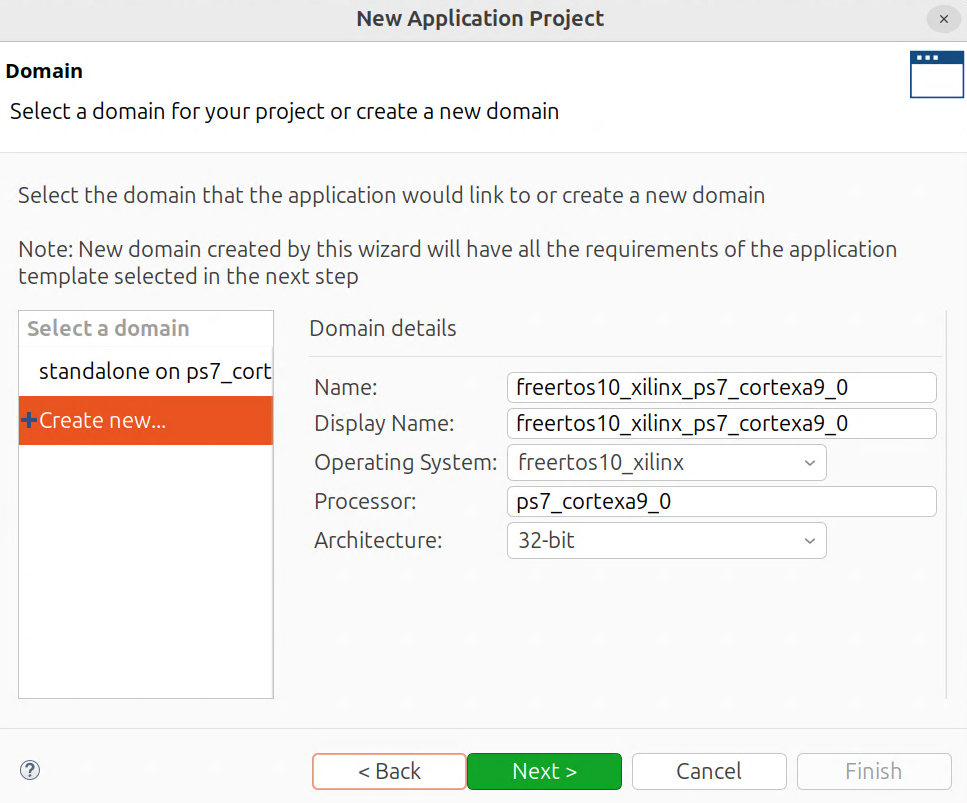
Create a new domain and set the Operating System to “freertos10_xilinx”
Select FreeRTOS Hello World

Import the same 3 files as before:
- main.c
- mmio.c
- mmio.h
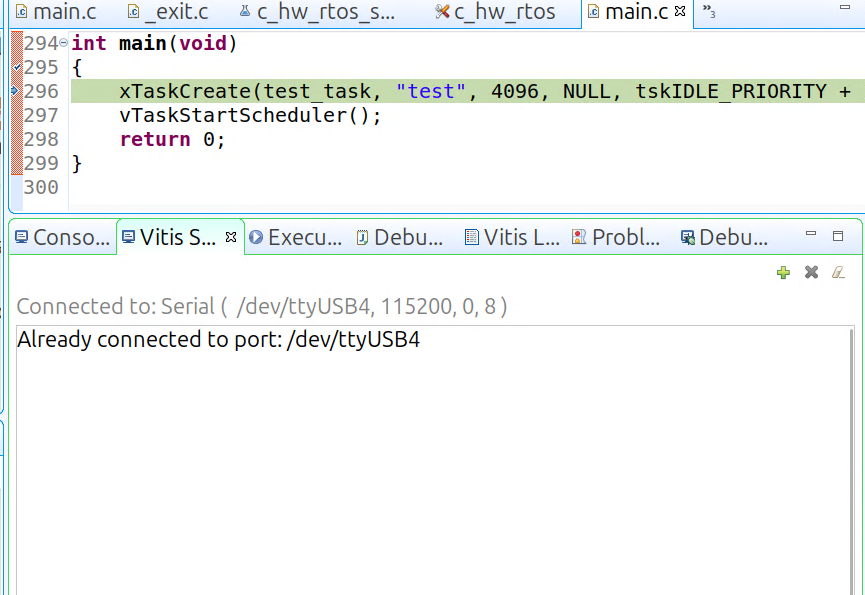
9 – Run FreeRTOS App
Create a Debug Configuration like before and run the application
The output should be different, notice the “xTaskCreate” and “vTaskStartScheduler” function calls:
Automated – Linux Only
1 – Build the Bitstream and XSA
Now for the fun part. With the help of Claude I wrote a bunch of Makefile rules/recipes that will automate everything done in the Manual mode. Simple, just run make and check the help menu.
john@asus:~/work/artyz7/arty_hw$ make
arty_hw — Arty Z7-20 hardware test suite
Vivado:
make xsa Build Vivado project and export XSA (25-35 min)
make xsa-clean Remove Vivado project and build artifacts
Bare-metal (JTAG):
make bare-metal-build Build standalone ELF (ps7_cortexa9_0, via xsct)
make bare-metal-run Program PL + run ELF via JTAG, capture UART
make bare-metal-clean Remove bare-metal Vitis workspace
FreeRTOS (JTAG):
make rtos-build Build FreeRTOS ELF (ps7_cortexa9_0, via xsct)
make rtos-run Program PL + run ELF via JTAG, capture UART
make rtos-clean Remove FreeRTOS Vitis workspace
Linux (PetaLinux board via SSH):
make deploy Cross-compile and scp test app to board
make deploy-run Deploy + run test app on board via SSH
Setup:
make fetch-board-parts Fetch Digilent board files into Vivado 2024.1 xhub
Utilities:
make tty Open Arty Z7 PS-UART in screen (115200 8N1)
make tty-list List screen sessions and processes holding any /dev/ttyUSB*
make tty-kill Kill any screen/process holding the Arty Z7 PS-UART
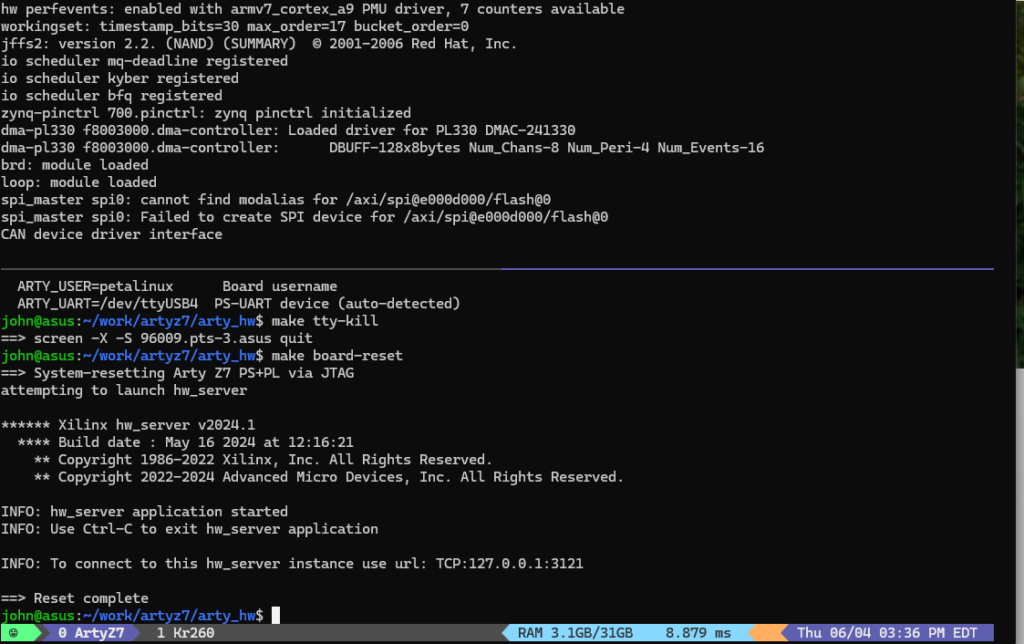
make board-reset System-reset the Arty Z7 PS+PL via JTAG (xsct rst -system)
make help Show this help
Variables:
ARTY_HOST=arty Board hostname/IP for SSH deploy
ARTY_USER=petalinux Board username
ARTY_UART=/dev/ttyUSB4 PS-UART device (auto-detected)You can tinker and see what boards are connected to your system. In my case I have the Arty Z7-20 and the Kria KR260:
john@asus:~/work/artyz7/arty_hw$ make list-all
==> USB serial ports:
  /dev/ttyUSB1   usb=3-2        if=01  Xilinx KR Carrier Card  serial=XFL1GRCZBY0R
  /dev/ttyUSB2   usb=3-2        if=02  Xilinx KR Carrier Card  serial=XFL1GRCZBY0R
  /dev/ttyUSB3   usb=3-2        if=03  Xilinx KR Carrier Card  serial=XFL1GRCZBY0R
  /dev/ttyUSB4   usb=3-3        if=01  Digilent Digilent Adept USB Device  serial=003017B7EAFD
==> JTAG scan chains (xsct):
  cable: Digilent Arty Z7 003017B7EAFDA
    device: arm_dap
    device: xc7z020
  cable: Xilinx SCK-KR XFL1GRCZBY0RA
    device: xck26
    device: arm_dap
And you can see which one is for your board. In this case we know it it /dev/ttyUSB4, but we can be more explicit by calling “make tty-list”
john@asus:~/work/artyz7/arty_hw$ make tty-list
==> screen sessions:
  (none)
==> /dev/ttyUSB* holders:
  (none)
==> Arty Z7 PS-UART (auto-detected): /dev/ttyUSB4
2 – Prerequisite – Build the XSA
Just run make xsa. It took 13 minutes on my ASUS ExpertCenter PN65
john@asus:~/work/artyz7/arty_hw$ time make xsa
make -C vivado xsa
. /tools/Xilinx/Vivado/2024.1/settings64.sh && JOBS=1 vivado -mode batch -nojournal -log build.log -source build.tcl

****** Vivado v2024.1 (64-bit)
  **** SW Build 5076996 on Wed May 22 18:36:09 MDT 2024
  **** IP Build 5075265 on Wed May 22 21:45:21 MDT 2024
  **** SharedData Build 5076995 on Wed May 22 18:29:18 MDT 2024
  **** Start of session at: Thu Jun  4 14:44:27 2026
    ** Copyright 1986-2022 Xilinx, Inc. All Rights Reserved.
    ** Copyright 2022-2024 Advanced Micro Devices, Inc. All Rights Reserved.
...
----
# puts "Wrote XSA: [file normalize arty_hw.xsa]"
Wrote XSA: /home/john/work/artyz7/arty_hw/vivado/arty_hw.xsa
INFO: [Common 17-206] Exiting Vivado at Thu Jun  4 14:59:46 2026...

real    13m11.710s
user    9m9.382s
sys     0m26.627s
3 – Build and Run the Bare-Metal Application
Now run “make bare-metal-build” and then “make bare-metal-run”, all output (for 10 seconds) will be captured and printed to the console
john@asus:~/work/artyz7/arty_hw$ make bare-metal-run
make -C apps/arty_hw_bm run
==> Configuring /dev/ttyUSB4 (115200 8N1)
==> Programming PL + downloading ELF via xsct load.tcl
attempting to launch hw_server

****** Xilinx hw_server v2024.1
  **** Build date : May 16 2024 at 12:16:21
    ** Copyright 1986-2022 Xilinx, Inc. All Rights Reserved.
    ** Copyright 2022-2024 Advanced Micro Devices, Inc. All Rights Reserved.

INFO: hw_server application started
INFO: Use Ctrl-C to exit hw_server application

INFO: To connect to this hw_server instance use url: TCP:127.0.0.1:3121

load.tcl: ELF running. UART output on ttyUSB at 115200 8N1.
==> ELF running -- capturing UART for 10s

==> Captured output (saved to bm.log):
------------------------------------------------
...
----- [mmio] AXI DMA echo (mem->MM2S->S2MM->mem) -----
  tx PA=0x00112880  rx PA=0x00113880  size=4096 B
  after reset:  MM2S SR=0x00000001  S2MM SR=0x00000001
  MM2S done after 37 polls, SR=0x00001002
  S2MM done after 0 polls, SR=0x00001002
  tx[0,1]=0xA0000000,0xA0000001  tx[1022,1023]=0xA00003FE,0xA00003FF
  rx[0,1]=0xA0000000,0xA0000001  rx[1022,1023]=0xA00003FE,0xA00003FF
  DMA echo: PASS (4096 bytes round-tripped)

=========================================
RESULT: ALL PASS -- 0 failures
=========================================
------------------------------------------------
4 – Build and Run the FreeRTOS Application
There are similar commands for the rtos version. Run “make rtos-build” and “make rtos-run”:
john@asus:~/work/artyz7/arty_hw$ make rtos-run
make -C apps/arty_hw_rtos run
==> Configuring /dev/ttyUSB4 (115200 8N1)
==> Programming PL + downloading ELF via xsct load.tcl
attempting to launch hw_server

****** Xilinx hw_server v2024.1
  **** Build date : May 16 2024 at 12:16:21
    ** Copyright 1986-2022 Xilinx, Inc. All Rights Reserved.
    ** Copyright 2022-2024 Advanced Micro Devices, Inc. All Rights Reserved.

INFO: hw_server application started
INFO: Use Ctrl-C to exit hw_server application

INFO: To connect to this hw_server instance use url: TCP:127.0.0.1:3121
...
----- [mmio] AXI Stream FIFO loopback (PG080) -----
  post-reset: TX vacancy=508 words
  writing 4 words to TX FIFO...
    tx[0] = 0xDEADBEEF
    tx[1] = 0xCAFEBABE
    tx[2] = 0x12345678
    tx[3] = 0xAABBCCDD
  RX occupancy=4 words, RLR=16 bytes (4 words)
  received 4 words:
    rx[0] = 0xDEADBEEF OK
    rx[1] = 0xCAFEBABE OK
    rx[2] = 0x12345678 OK
    rx[3] = 0xAABBCCDD OK
  FIFO echo: PASS

----- [mmio] AXI DMA echo (mem->MM2S->S2MM->mem) -----
  tx PA=0x0011E880  rx PA=0x0011F880  size=4096 B
  MM2S done after 37 polls, SR=0x00001002
  S2MM done after 0 polls, SR=0x00001002
  tx[0,1]=0xA0000000,0xA0000001  tx[1022,1023]=0xA00003FE,0xA00003FF
  rx[0,1]=0xA0000000,0xA0000001  rx[1022,1023]=0xA00003FE,0xA00003FF
  DMA echo: PASS (4096 bytes round-tripped)

=========================================
RESULT: ALL PASS -- 0 failures
=========================================
------------------------------------------------
Miscellaneous
Enumerate all connected boards
I added a utility recipe / rule to list all connected FPGA boards. For this portion of this article, I connected 3 total boards:
- Kria KR260
- ArtyZ7-20
- Arty A7-100T
john@asus:~/work/artyz7/arty_hw$ make list-all
==> USB serial ports:
  /dev/ttyUSB0   usb=3-4        if=00  Digilent Digilent USB Device  serial=210319AFEEC7
  /dev/ttyUSB1   usb=3-2        if=01  Xilinx KR Carrier Card  serial=XFL1GRCZBY0R
  /dev/ttyUSB2   usb=3-2        if=02  Xilinx KR Carrier Card  serial=XFL1GRCZBY0R
  /dev/ttyUSB3   usb=3-2        if=03  Xilinx KR Carrier Card  serial=XFL1GRCZBY0R
  /dev/ttyUSB4   usb=3-3        if=01  Digilent Digilent Adept USB Device  serial=003017B7EAFD
  /dev/ttyUSB5   usb=3-4        if=01  Digilent Digilent USB Device  serial=210319AFEEC7
==> JTAG scan chains (xsct):
  cable: Digilent Arty A7-100T 210319AFEEC7A
    device: xc7a100t
  cable: Digilent Arty Z7 003017B7EAFDA
    device: arm_dap
    device: xc7z020
  cable: Xilinx SCK-KR XFL1GRCZBY0RA
    device: xck26
    device: arm_dap
Reboot the Board
When playing around with Linux (Ubuntu) or PetaLinux, I sometimes want to reboot the boad without having to unplug it and plug it back in (or by pressing the reset button).
What I do is (using tmux) I run “make tty” to listen to the serial port interface from one window, and then from another I run “make board-reset” and I can watch the tty window reset. In my case I switched by Dip switch back to SD card and can watch it boot up to Ubuntu: